

How To Use Google Dns Windows 10
Disclosure: Bonkers About Tech is supported by its readers. When you buy through links on our site, we may earn an affiliate commission. Thanks.
If you're looking for a way to better your browsing speed, so using Google's public DNS could practice just that.
DNS is a massive role of the Net's infrastructure and is oftentimes dubbed the phone volume of the internet. The thing is, every time you request a web page in your browser, your reckoner does a DNS lookup to locate the IP address of the website's server you're requesting.
Now as spider web pages become more and more circuitous, there are more and more of these DNS lookups happening in the background then that the browser tin load the resources it needs to in social club to display web pages properly. These DNS lookups can crusade significant bottlenecks and tin can actually increase the time it takes to load a webpage.
Google have decided to help with this problem past creating a public DNS service that everyone tin utilise. They've used a number of techniques in their service from provisioning enough servers, preventing DoS attacks, providing global coverage and more which should help speed up DNS lookup times.
If all this talk almost DNS is going over your head a little, and then I've written a blog post about DNS in plain English which should help you to understand it.
If you're just interested in speeding upwardly your browsing stick with me. I'll show you stride-by-step how you can use Google'southward public DNS service to speed up your web browsing and likewise increment your security too.
Ready? OK cool, let's become cracking then.
How To Employ Google DNS in Windows 10
Follow these steps to use Google DNS when you're browsing the internet:
Footstep 1
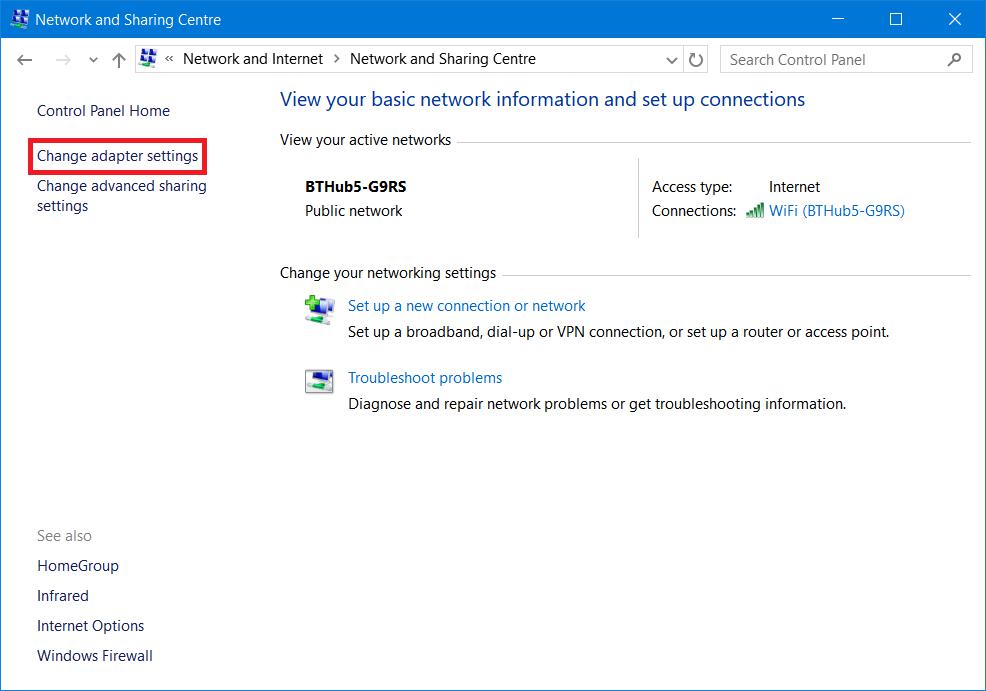
OK so the showtime thing we need to do is go to the Network and Sharing Centre.
To do this head over to Control Panel -> Network and Internet -> Network and Sharing Heart
Step 2
On the left manus side of the Network and Sharing Centre, click Change adapter settingsto meet your Network Connections
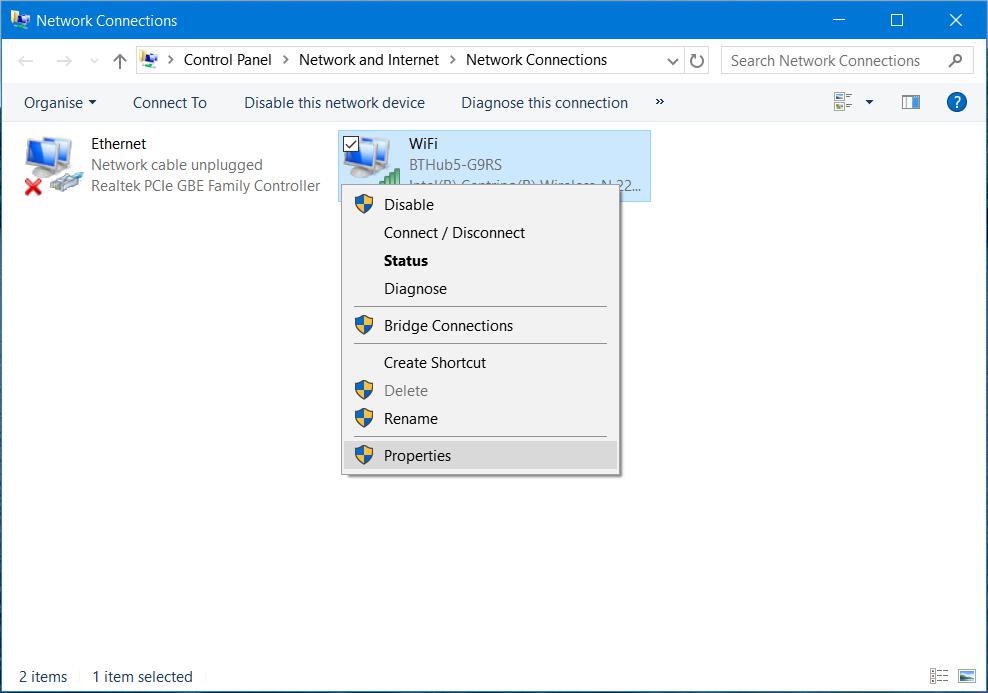
Step 3
Right click on the connection that you tend to use. So if you're connected to the Net via an ethernet cable, right-click "Local Area Connectedness" and click Properties. If you're continued via a wireless connection, like myself in the example below, correct-click "Wireless Network Connectedness" and click Properties.
Footstep four
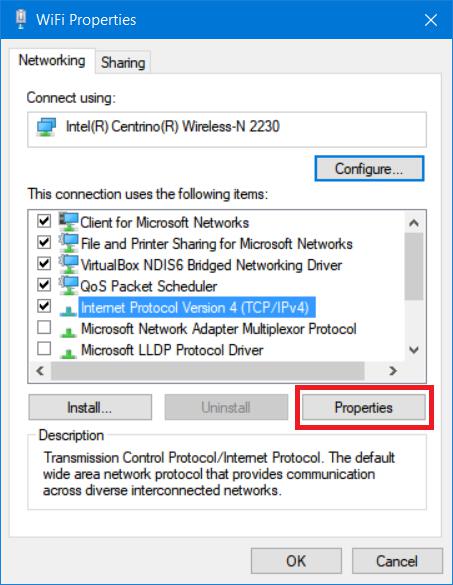
Next, observe and highlightCyberspace Protocol Version 4 (TCP/IPv4) in the list and hit Backdrop.
Step five
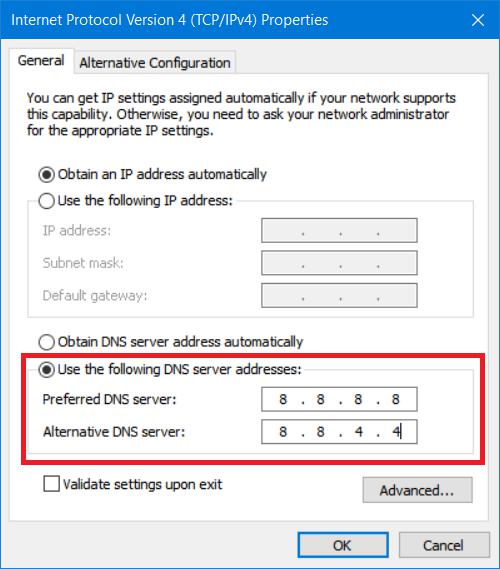
In the backdrop window that pops up, select the radio button side by side to "Use the following DNS server addresses". Then for the "Preferred DNS server" and "Alternate DNS server" enter the following IP addresses:
Preferred DNS Server: viii.8.8.8
Alternate DNS Server: 8.8.4.4
Step 6
Click OK, shut any open windows and so restart your figurer for the changes to take event.
Step 7
Once your computer has restarted, it's worth opening your browser and checking that your favourite websites brandish OK.
Obviously you'll want to cheque https://www.bonkersabouttech.com displays correctly and as well that http://139.162.251.192 resolves and redirects to https://world wide web.bonkersabouttech.com correctly 🙂
So in that location you go, that's how to use Google's public DNS! I hope it'southward made your web pages load a bit faster, information technology's certainly made my browsing experience that fleck snappier!
Requite this a try yourself and permit me know your experiences by leaving a annotate below, I'd like to hear from you 🙂
Thank you!
Source: https://bonkersabouttech.com/how-to-use-google-dns-in-windows-10/
Posted by: dowdlelaccand.blogspot.com
0 Response to "How To Use Google Dns Windows 10"
Post a Comment